


Properly fitted horseshoes are essential for the health and well-being of horses, as well as their optimal performance in various activities. In this guide, we will delve into the importance of horseshoe fitting, examining the types of horseshoes, fitting methods, and how to ensure the horse’s comfort and safety throughout the process.
Preparing the Horse’s Foot for Shoeing

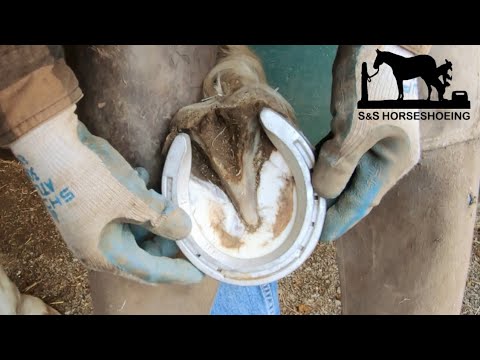
Proper preparation of the horse’s foot is paramount when planning to fit a new shoe. As discussed in our earlier section regarding foot construction, you’re primarily aiming to eliminate the new growth in the foot’s wall since the previous shoeing.
Removal of Wall Growth
Excess growth of the wall, a crucial structure of the horse’s hoof, can be addressed using a “toeing knife,” a special tool designed to trim the hoof’s hard outer layer. Alternatively, you can also use “hoof cutters”, which work like pincers to remove the overgrown parts of the wall.
Leveling of the Wall
After cutting back the excess in the hoof wall, you need to ensure the foot remains level and smooth. This process involves the use of a rasp, a coarse file that makes the foot’s surface even and prepares it for the shoe fitting. A leveled foot helps the shoe fit better and enhances the horse’s comfort and gait.
Creating Beds for the Clips
The process of preparing the horse’s foot is capped off by making beds for the clips in the hoof’s horn. This can be achieved using the same toeing knife or, alternatively, a “drawing knife” designed specifically for this purpose. The clips serve as the securing point for the horseshoe, making sure it stays attached to the horse’s foot, providing the necessary protection and support.
Fitting the Horseshoe
Fitment of the horseshoe must be carried out meticulously to ensure the shoe matches the foot of the horse. It’s crucial that the farrier adjusts the shoe accordingly, instead of cutting or rasping the hoof to force a fit—much like you wouldn’t want a shoemaker to alter your foot to suit a shoe that doesn’t fit.
Hot Shoeing
The most common method of shoe fitting is “hot shoeing.” In this process, the shoe is heated in a forge before being placed on the hoof’s bearing surface. The farrier then observes the slight charring of the horn to gauge key factors such as fit, size, shape, and bearing. When the bearing is level, the heated shoe will leave an even mark around the hoof, indicating an ideal fit at all points with no open spaces.
While hot shoeing, with its smoke and burning scent, may seem painful to onlookers, it isn’t a painful process for the horse since the horn is insensitive. However, the horse’s sensitive structures, rich in nerve distribution and closely connected to the insensitive parts, can feel even the lightest touch.
Cold Shoeing
Another fitting method is “cold shoeing,” which involves selecting the most suitable ready-made shoe from the farrier’s stock. This process demands greater skill and a more discerning eye, but a proficient farrier can still achieve excellent results using this approach.
Reusing Old Shoes
When there is still usable life in the old horseshoes, they can be reused after trimming the excess horn. This practice is called “removing” the shoes and can save time and resources while still providing the necessary support and protection for the horse’s hoof.
Nailing the Horseshoe
Nailing the horseshoe is a delicate operation that involves varied number of nail holes depending on the shoe set. Machine-made shoes often have more nail holes compared to the hand-made ones, but this doesn’t mean they all need to be utilized. The primary goal is allowing the farrier flexibility in choosing nail placements.
Deciding on the Number of Nails
The norm is to use the minimum number of nails necessary to keep the shoe in position. Seven nails are usually used, with three at the inner quarter and four at the outer quarter. To ensure the shoe remains in place for an extended period, both the nail heads and holes, made with a wedge-shaped tool known as a “stamp,” are designed to last as long as the shoe.
Opening the Nail Hole
A “pritchel” is finally employed to make the nail hole wide enough at the ground surface for the nail to pass through. This further solidifies the bond between the nail and the shoe, ensuring it holds firm even in the face of wear and tear.
Driving the Nails
Driving nails into the hoof efficiently is a task that requires skill, experience, and accuracy. The white band, mentioned earlier, is key in determining the wall’s thickness and hence the level at which the nail points should emerge.
If the nails are driven at too slanted an angle, they penetrate too low in the wall, resulting in an insecure hold and risk of breaking away the horn. Conversely, when driven too high, nails may approach the fleshy lining of the wall, causing potential bruising or piercing, the latter resulting in what’s known as a “prick”.
Moreover, badly placed holes—either too near the shoe’s outer edge, called “fine stamping,” or too near its inner edge called “coarse stamping”— can lead to these problems. Thin-walled horses present additional challenges, as their fragile hoof makes pricking more common, but an experienced farrier aims to avoid this at all costs.
Despite the utmost caution, there are times when the nail point inadvertently turns inwards while being driven. Given the wall’s slope, nails at the heel are typically driven slightly lower than at the toe to accommodate this variation.
Clenching the Horseshoe
Clenching involves securing the nails driven into the horse’s hoof firmly to ensure the shoe stays in place and safe from potential injury.
Securing the Nail Points
While driving each nail through the hoof wall, the farrier promptly twists off its point using the claws of the driving hammer. This safeguard prevents injuries in case the horse makes sudden, unanticipated movements.
Forming and Hammering the Clenches
Once all nails in a shoe are driven, the farrier positions the closed jaws of a pair of pincers against each stub, or broken end, and hammers the nail head. This process turns over and shapes the “clenches,” which are subsequently hammered flat into the wall and smoothed with a rasp.
To avoid any injury, the farrier should not rasp above the clenches, as it would serve no purpose besides removing the periople— the outermost layer of the hoof wall—unnecessarily, potentially causing harm to the horse.
Affixing the Clips
During hoof preparation, there are additional features to install, like clips. These are designed to provide further security and stability to the fitting process.
Preparing for the Clips
While preparing the horse’s hoof for shoeing, the farrier carves small, shallow beds into the hoof wall. These beds are made specifically to accommodate clips.
Installing the Clips
Once the beds are prepared, the clips are hammered flat against the hoof wall. This adds an extra layer of stability to the horseshoe fit, ensuring it remains securely in place even under rigorous conditions.
Finishing the Shoeing Process
Adding the final touches to the shoeing process requires care and precision. This step tidies up the hoof and prevents any potential damage.
Smoothening the Edge
The first step of the finishing process involves using the corner of a rasp to tidy up the edge of the wall where it meets the shoe. This helps in removing minor horn shreds and slightly beveling the wall to mitigate risks of splitting.
Ensuring Limited Rasping
Importantly, only one or two quick rasping strokes are required, and that too, only at the wall’s edge. Overzealous rasping on the lower part hints at a shorter shoe toe, leading to the foot being forcefully conformed or “dumped” to suit the shoe.
Such dumping could remove precious periople— the outermost layer of the hoof wall— thereby leading to increased horn brittleness. Note that this downside also arose from the outdated practice of sandpapering around and above the nails.
What Good Shoeing Looks Like
While a neat finish, enhanced with a tasteful application of hoof-oil, may appear visually pleasing, it’s essential to understand that good shoeing doesn’t need such cosmetic enhancements. Optimum craftsmanship doesn’t equate to neat effects but lies in the precision of the shoeing process and the comfort of the horse.
Non-Slip Shoeing
As winter conditions can make roads icy and slippery, it becomes necessary for horses traveling on these roads to have additional precautions against slipping. Here, we will explore such methods designed to enhance horse safety during winter months.
The Roughing Method
While the term “roughing” is often used broadly to encompass all anti-slipping devices, it primarily pertains to a distinct modification of the horse’s shoes. In this process, the shoes are removed, and if calkins—a certain kind of heel protrusion—are not present, these are created by bending down the heels. These new calkins are then imparted with a chisel edge to increase traction. Sometimes for heavy draught horses, extra sharpened wedges are added to the shoe’s toe. Nevertheless, the frequent removal and sharpening of the shoes required by this technique can be its downfall, leading to its current state of only rare usage.
Introduction of Frost Nails
Frost nails, characterized by their sharp, hard heads, are used in place of standard nails at the heels and sometimes the toes. Alternatively, they may also supplement wide-fitting shoes at the heels: here, their shafts are bent over to secure them. While they are effective at preventing slippage, their functionality diminishes relatively quickly owing to wear.
Utilization of Frost or Screw Cogs
Compared to frost nails, frost (or screw) cogs have more advantages. As a safety measure, these cogs can be removed at night to prevent any harm to the horse and are screwed into customized holes positioned at each heel, and occasionally the toes as well. Upon removal, it’s recommended to place “blanks” or dull cogs to preserve the threading inside the holes and to prevent them from becoming rough around the edges. Different types of heads are available for these cogs, and if one opts for the chisel-edge type, they should be placed in the positions prescribed in the “Roughing” method.
Even though these methods have played their parts in reducing slipping, they do come with certain disadvantages, leading to their gradual replacement by more modern techniques.
“Mordax” Studs for Non-Slip Shoeing
“Mordax” studs are designed specifically for horse shoes, providing an excellent anti-slip solution. These stud types, supplied in various sizes and adjustable to tapered, screw, and plug types, are designed for easy installation, long-term wear, and can be left in shoes until the horse shoes wear out.
The Exceptional Grip of “Mordax” Studs
In the “Mordax” stud configuration, the horse’s weight pushes the stud’s hard center pin into the surface, providing an excellent grip and halting any potential slippage without causing any uncomfortable jarring.
Fitting and Removing “Mordax” Studs
Installation of these studs involves drilling or punching holes into the horse shoes while they’re hot. These holes are then tapered using a special punch included with the studs. Once the shoes have cooled down, the studs are placed into the holes and hammered in until they are flush with the shoe. To secure the studs further, a slight cold-riveting can be performed at the back of the stud. When it’s time to replace the horse shoes, the studs can be easily punched out.
“Mordax” studs are made with an exceptionally hard metal at their center, which ensures their long-lasting durability. They are, in fact, guaranteed to last for a minimum of 350 miles of hacking and hunting and 250 miles for light draught horses under regular conditions.
Usually, one stud is fitted into each heel, totaling eight studs for a set of horse shoes. However, the manufacturers advise against placing these studs in the front toes of riding horses to prevent any potential discomfort.
Alternative: “Mordax Nails”
For horses of a lighter breed, “Mordax Nails” can be used as a suitable alternative to the studs. These nails offer sufficient protection preventing horse and riders from slipping, and just one or two nails per shoe are adequate for this purpose.


